Installing custom firmware on your DJI M100 or M600 aircraft
This document will describe the steps required to install a custom firmware on to your DJI m100 or M600 aircraft. This document will not provide instruction on modifying the firmware itself, there are other informational pieces which address that aspect. To make your own firmware please access the firmware tools here: https://github.com/o-gs/dji-firmware-tools
To install custom firmware on your M100 or M600 aircraft, you will need:
- Custom firmware file specific to aircraft and version
- DJI assistant 2 version 1.12 beta (must be this version)
- Windows 7/8/10 PC
- USB Connector for aircraft
- Aircraft with fully charged battery
After you have secured the custom firmware file, download DJI assistant 112 beta from this location:
https://archive.org/download/DJIAssistant2Beta112_201804/DJI%20Assistant2%20Beta112.zip
- Unzip the DJI assistant archive file
- Extract the contents to a location you can remember, such as your C:\ drive, or a folder on your desktop.
After unzipping the application
- Connect your M100/M600 to the computer using the USB cable
- Remove any gimbal/camera clamps or covers
- Turn on the aircraft. Do NOT turn on the remote controller.
- Now, open the assistant2.exe file located in the folder you just extracted
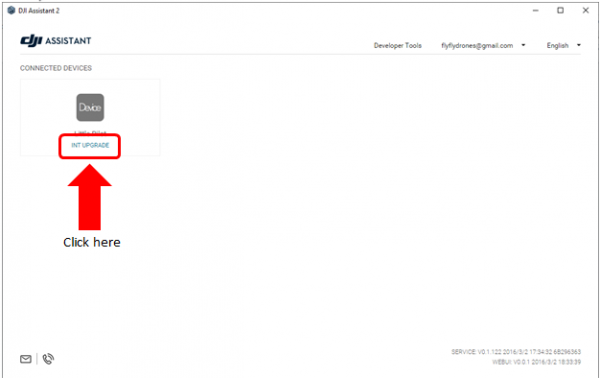
This will open the DJI assistant 2 application. At the main screen, it should detect the aircraft and show it as an icon on the left. Do not click on that aircraft icon yet. We are going to push a key combination on your keyboard to unlock a hidden feature in assistant.
On your keyboard, press and hold CTRL + SHIFT and then press F10 key once. Let go of CTRL + SHIFT. In DJI assistant 2, you should notice the words “INT UPGRADE” show up under the name of your aircraft.
After pressing CTRL + SHIFT + F10
Click on “INT UPGRADE” and it will open a new screen.
This screen will allow you to update individual modules. This is a powerful, but dangerous area to show regular users. The potential for bricking your aircraft is high if you don’t understand what you are doing.
Insert disclaimer here: DO NOT UPDATE ANY MODULE WHICH IS NOT SPECIFIED HERE; DOING SO WILL BRICK YOUR AIRCRAFT AND IT CANNOT BE FIXED. DO NOT DEVIATE FROM THESE STEPS, DOING SO MAY RESULT IN YOUR AICRAFT BEING BRICKED. DO NOT USE FIRMWARE WHICH IS NOT FROM A TRUSTED SOURCE; MAKE YOUR OWN FIRMWARE. DO NOT FLASH ANY FIRMWARE WHICH DOES NOT MATCH YOUR AICRAFT MODEL AND VERSION SPECIFICALLY. DO NOT COMPLAIN TO ME IF YOU BRICK YOUR AIRCRAFT. HAVE I BEEN CLEAR ON POSSIBLE RISKS? OKAY LETS STOP USING CAPS NOW!
On this page you will see a list of different modules in which you could flash firmware. Each line represents a different firmware module, showing the version, ability to chose/load a file and then upgrade ability. DO NOT CLICK ON LINKS OR BUTTONS YOU DO NOT UNDERSTAND.
On this page, find the FlightCtrl module.
- On right, click the three dot s … which will allow you to load a firmware file.
- Navigate to your modified flight controller 306 module file and chose open.
- Now, you can press the Upgrade button on the right side and this will start the update process.
- Once the update is done, you can power off the aircraft and unplug from the PC.


